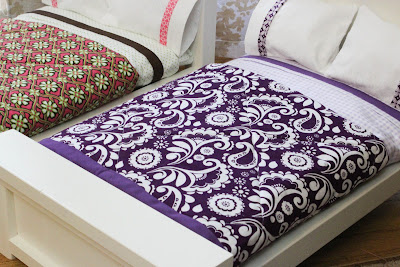
Ryan's nieces love their American Girl dolls, so I wanted to make them something for Christmas that their dolls could use. Their dolls already have millions of outfits. Why not furniture? I came across lots of ideas including this picnic table, which I'm also dying to make. Ultimately, I decided on these farmhouse beds from Ana White.
One niece likes pink and the other likes purple. I spent a long time in the fabric store choosing fabrics to go together. So long in fact, that some woman asked me for help, because she thought I worked there.
The beds fit 18" dolls.
The reverse side of the quilts are awfully cute too.
We used step by step instructions for the farmhouse bed from Ana White's blog. If you've never been to her site, you have got to check it out! She is incredibly talented, a lumber goddess really. The best part of it all is that she makes it easy for you to build beautiful things too. Go to her site, you'll see.
A couple of things we did differently from Ana White's instructions. We only used four panels in the headboard and foot board (with five slots it was wider than we needed). Also, to save money, we used thick cardboard (instead of plywood) to support the mattress.
The beds coming together.
Once Ryan finished putting the beds together, I used wood filler on the screw holes then sanded the whole bed down. I then primed and painted the beds with some paint I had leftover from the antique dresser and hutch.
Now for the bedding. Remember I'm no expert. But I'll try to explain how I made the doll quilts.
For each quilt you'll need:
- 7 fabrics of your choice, 1/8 of a yard each
- 1/2 yard fabric for reverse side (I had extra so you could probably use 1/3 yard)
- batting for inside of quilt
- binding in coordinating color (3 yards length)
Start by cutting your seven fabrics down to 3 inches wide. I'd use a rotary cutter if you got one, it's a lot easier than scissors.
Stitch together the strips using a 1/4 inch seam allowance.
Iron down the seams so they'll lay flat. Now cut 3" strips running the other way.
Arrange the strips in a diagonal pattern to form the size of quilt you'd like. You'll have to pull apart some strips to form a square. My quilts were 7 x 8 squares. Although in the future I'll probably make the quilts a little wider, maybe 7 x 9/10.
Iron down all of the seams again. Then cut batting to fit the size of your quilt. Do the same for the reverse side fabric. Sandwich the batting between the quilted fabric and the solid piece.
Now for the mattress. The instructions call for making a mattress out of 1-2" foam. I had no foam, so I decided to just wrap some thick cardboard with batting. It worked just fine.
I made the sheets out of flannel since it was on sale and it's cozy. A yard turned out to be the perfect amount to make a fitted sheet for the mattress and a top sheet. To make the fitted sheet, just sew it like you would a pillow. Cut it to fit the mattress with a 1/4" seam allowance. Then stitch three sides. Insert the mattress and hand stitch the sheet closed.
For the top sheet, I folded the top down and then back up and stitched in place. I had a bit of binding left from the quilts, so I used iron-on hem tape to add the binding to the sheets.
You can see how stiff the quilt looks. I learned the hard way not to use fusible batting. I thought that it would make it easier while I was quilting, but apparently it doesn't break down and get soft very easily. I washed the quilts so they would have that cozy worn quilt look, but they still stayed pretty stiff. So avoid fusible batting if you can.
$9.74 Fabric for quilts
$5.40 Batting (I used this for the mattresses, quilt, and pillow stuffing)
$5.98 Binding for quilts
$5.58 Flannel for sheets
$2.10 Fabric for pillows
+ $11.98 Wood for bed frame
$40.78 for the materials for both beds, which means that we made each bed for $20.39!
Now that's a steal for these beautiful handmade beds. I know the girls love them and the beds are so sturdy, they'll last a long time. Noni (Ryan's Italian grandmother) said, "Now that's something that can be passed down to their kids." Of course his brother freaked out at the thought of his little girls having kids. They grow up so fast, don't they?
Thanks so much Ana White for the incredible projects that your site provides.
Pin It


Gotta love Ana white! Those are adorable
ReplyDeleteBeautiful work! I still have the doll beds my mom made for me :) They will be cherished for sure!
ReplyDeleteUmmm that's simply amazing!!! Wonderful job, Ashley and Ryan!
ReplyDeleteThese are the cutest things EVER! I just love them! Great work!!
ReplyDeleteThanks everyone! It's fun to make mini versions of anything, I would say.
ReplyDeleteI absolutely love the mini quilts. Do you have any idea of the name of the purple fabrics? My little granddaughter's new room is in purples and this would look great for her doll bed.
ReplyDeleteThanks Sugarbabe! They are fabrics made exclusively for Joann's. All of the fabrics that I used were called Quilter's Showcase Fabric.
ReplyDeleteHere are links to two of the purple fabrics:
http://www.joann.com/joann/catalog/productdetail.jsp?CATID=cat3075&PRODID=zprd_11060019a
http://www.joann.com/joann/catalog/productdetail.jsp?CATID=cat3075&PRODID=zprd_11059540a
If you go to a Joann's you should be able to find the rest of them. I thought they were the most beautiful quilt fabrics in the store and they also happened to be the cheapest at $3.49 a yard. Happy sewing!