Sunday, October 23, 2011

DIY Lady Owl Costume


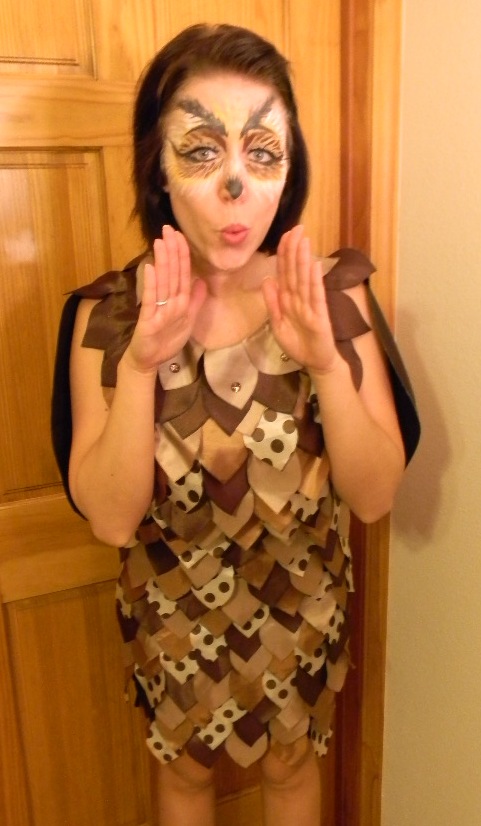
I was determined to make my own costume this year...on the cheap. The materials for this little owl costume ended up costing less than twenty dollars! I'm so happy with how it turned out and it was so easy. Anybody could do it and it would be great adapted for kids or even babies (how cute would a Onesie with these little fabric feathers be?).

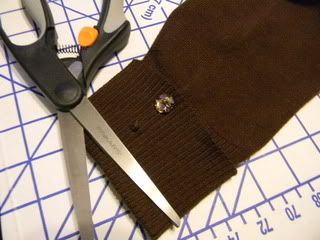
I was inspired by this really cute homemade owl costume by Chelsea over at Seablanket. She used a pillowcase, but my...girly figure (to put it nicely) wouldn't exactly fit in the pillowcase I tried. Easy solution: clearance dress from Ross. I was originally looking for a mod 60's boxier dress shape, but no luck. I did however find this sweater dress for $7.99. Here's the before :


I went to Joann's, 20% off coupon in hand, to gather fabrics for my costume. The fabric I decided on is actually lining. It's lightweight, cheap, and it has a pretty sheen. I originally bought the zebra fabric thinking it might look feathery  once cut in the right shape. But in the end, I decided against the zebra print.


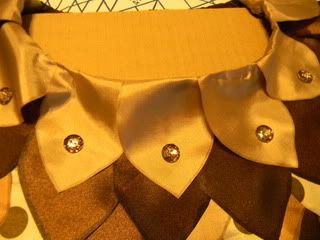
I cut out large petal shapes from each fabric color. The only problem with the fabric I chose was that it frayed easily. So I ran a little Fray Check along the edges and problem solved. When it came to putting the petals on the dress, my little hot glue gun worked like a charm. Quick and easy.


I cut the turtleneck flap and the sleeves off of the dress. Not being able to pass up a little bling, I took the buttons from the sleeves and glued them on to the collar. 
  

Almost done...

Time for the final touches. I cut out some little wings from the extra fabric. Never mind the fact that they look more like bug wings than owl wings. Whoops. I ran some copper glitter glue around the wing edges (any excuse for extra sparkle) then hot glued them to the dress. To jazz up my face we found this face paint and these feather eyelashes on Amazon.


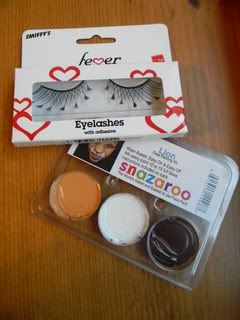
Luckily, I have Ryan and his great artistic ability around to help. We looked at some examples of owl make-up on Youtube. There are some incredible face painting tutorials! He "owlified" me in about ten minutes. I slapped on some glitter and my feather lashes and the budget-friendly transformation was complete.


Some of you might be thinking that you don't have the time to put this together. But there are quite a few ways to cut down on the time. The easiest way would be to make the "feathers," what I've been calling petals, much bigger cuts of fabric, like Chelsea did. Also, the wings can easily be left off the costume. The most time consuming step for me was running Fray Check along the edges of each petal. With different fabric or if you just don't mind a few dangling strings, skip that step completely = major time saver.


We had a lot of fun at the costume party! Ryan dressed up as a poacher and ran around shooting me with his Nerf shotgun. Who hunts polka-dotted owls? My guy. I was even given a tiny little trophy for "Best Costume." That tiny golden jack-o-lantern made it all worth it.


Pin It

Monday, October 17, 2011

Mouth-watering Jalapeno Popper Dip

It's cheesy, it's gooey, it's tangy, it's spicy. Everybody loves this dip! And I mean everyone. Even my friends who don't like spicy food, overcome their aversion to peppers, in order to eat it. It's love at first taste for most. I can't even count how many times I've been asked for the recipe.

This dip incorporates all that is delightful about a jalapeno popper : the creaminess of the cheese, the toasted breadcrumbs, and the heat from the peppers. You can easily adjust the spiciness to your liking. No matter what, this dip aims to please. It's a real guilty pleasure. 

With football season rolling around, this is a handy little recipe, easy to whip up, in a hungry-group-of-football-fans kind of emergency. 


I always serve this dip with toasted baguette slices. The crunch and flavor of the fresh bread is unbeatable. In a pinch, tortilla or pita chips would suffice.

Jalapeno Popper Dip
I always double this recipe and use a 9"x13" Pyrex. Reason: it goes fast and you don't want to deal with hungry friends when the popper dip runs out. Not pretty. And if by some miracle there are leftovers, this dip tastes even better the second time around.
  • 2 (8 oz.) packages of Neufchâtel cheese (labeled as: 1/3 less fat cream cheese), softened
  • 1 cup sour cream
  • 1 (4 oz.) can diced green chilies
  • 1 (4 oz.) can diced jalapenos
  • 1 1/2 cups shredded Parmesan cheese
  • breadcrumbs (I like to use the garlic and herb flavored crumbs)
  • freshly ground black pepper
  • baguette
  • olive oil
Preheat the oven to 350 degrees. Using a hand mixer, beat together cream cheese and sour cream. Stir in the diced green chilies and jalapenos. Mix in 3/4 cup Parmesan cheese and add freshly ground black pepper, to taste. 

Spread the mixture into an 8"x 8" glass Pyrex pan. Sprinkle with the remaining Parmesan cheese. Top with a thin layer of breadcrumbs. Spray the breadcrumbs with cooking spray (it helps them turn golden brown). Bake for 30 minutes or until the cheese is good and melted.

While the dip is baking, slice the baguette. Spread baguette slices on a baking sheet and drizzle with olive oil. Once the dip is done baking, turn the oven up to 400 degrees. Bake the baguette slices for 5-10 minutes or until lightly toasted.


Pin It

Sunday, October 16, 2011

Pumpkin Muffins with Streusel Topping

I am loving my first fall in Paradise. Back home by now, it would be rainy and gloomy. Here the sun is still shining, but now there is a slight breeze. The air smells different, good different, and the leaves are beautiful shades of gold and orange. A girl can definitely get used to this. 

Whenever fall rolls around, I think of this recipe. Ok...ok, who am I kidding, I make these muffins all year-round. But they seem especially fitting when summer turns to fall. As these muffins bake, they fill your entire house with the delicious aroma of cinnamon and pumpkin. Every time I make these, I think about how incredible it would be to awake to the smell of them. So if you happen to have family or friends visiting... that you want to spoil...you should sneak to the kitchen (before they wake up) and get these little guys in the oven. You'd be the best hostess (or host) ever!


Pumpkin Muffins with Streusel Topping and Cream Cheese Drizzle 
Adapted from Stephanie's Kitchen

For the muffins:
3 cups All-purpose flour
1 1/2 Tbsp. baking powder
1/2 tsp. salt
1/2 tsp. pumpkin pie spice
1 tsp. cinnamon
1/2 cup butter, melted
1/2 cup sugar
1/2 cup brown sugar
2 eggs
1 tsp. vanilla extract
1/4 cup milk
1/4 cup heavy cream
1 cup canned pumpkin

For the crumble:
1/4 cup brown sugar
2 Tbsp. All-purpose flour
1/2 tsp. cinnamon
1 Tbsp. butter, melted

Robot Baby Gifts


I found a lot of robot gifts for Baby Riot that also doubled as decorations for the shower. I want to share them with you, as well as great gifts from other people at the shower, in case any of you know a little boy who loves robots.

Forget the teddy bear, this stuffed robot is the cutest thing ever, right? Riot's gonna love him!


This book is ADORABLE. There are gears that spin, which will be great when the baby gets a little older.


What baby's room would be complete without a robot bobble head?


These little onesies were made by Chelsea's friend and hair stylist. She is so creative! She screen-printed them all herself. She also makes hair pieces that my sister and I love to wear. Visit her Etsy shop.


Last but not least, my favorite gift for the baby was from my amazing friend Sarah. She painted an original piece of robot art for his room. I adore Sarah and I adore this little canvas. You can read more about how Sarah made this work of art at her blog : Miss Sarah.


Happy mommy-to-be and Patsy


Pin It

Robot Baby Shower Decor


I wanted to share some of the details from the robot baby shower. 


This is another thrift store frame that I spray painted. It's an easy way to a give a pop of color, as well as label different areas of the shower. There were a lot of people that didn't know each other, so I thought that name tags would be nice. They were especially nice in keeping track of points during the games.


The Robot Party Cricut cartridge arrived the day before the shower, so I was able to make this banner just in time. The cartridge hand so many amazing shapes, I wish that I would have found it sooner. Oh well, I guess Riot is just going to have to have robot-themed birthday parties as well. 

I had this piece of wall "art" laying around in the garage. I bought it a few years ago on clearance at Target for $8. I figured just the frame was worth that much.

I wasn't in love with the tropical leaf so I took it out. I painted a few coats of chalkboard paint directly on the glass. Not digging old-school chalk, I ordered these little guys on Amazon. Chalkboard markers are so cool!

Ryan was an amazing help with all of the decorations. Guests really liked his welcome sign using the chalkboard. Check out the after. The new mommy liked it so much, she asked if she could put it in the baby's room. After the shower, Ryan erased Welcome and wrote Riot's Room.

Ryan also used the chalkboard markers to add these little robots to the bathroom mirror. The markers can be used on chalkboards, windows, mirrors, and more. All it takes is a little water to clean it off.


How cute is the robot baby with a robot teddy bear?!


Many of the photos by Sarah


Pin It

Thursday, October 13, 2011

Robot Baby Shower Favors

We go through a lot of bottles of Starbucks Mocha Frappaccino at our house. We buy them by the case at Costco. So I was so excited when I came across this great idea using the bottles over at Kerry's Crafts. I began hoarding the bottles in our mud room, knowing that I would find a use for them eventually.


TA DA! I decided to finally put the bottles to use in creating the favors for my sister's vintage robot-themed baby shower. The first step was getting the sticky labels off. After hand-washing the first ten bottles and slowly peeling off the labels, not without much frustration, it dawned on me to put them in the dishwasher. Not only does the dishwasher get them spic and span, but right after the drying heat cycle the labels peel off so easily. Just make sure you pull them out and take the labels off while the bottles are still warm.

After the lids were clean, I primed them with a primer spray paint. Trust me you're gonna wanna prime the lids, because the Starbucks logo is very dark and will show through. Then I followed up with some sparkly silver spray paint.


Once you have clean bottles and painted lids, it's time to cut the paper. I used a vintage looking paper pad by My Mind's Eye called Complete Boy. I cut the paper into strips 2 1/2" wide and 9 1/2 " long. 


Put a strip of double-stick tape on each edge and a little strip in the center. Wrap the paper around the bottle, secure the edge and voilà...


I punched out circles and robots then ran them through my sticker maker so that they would stick really well to the bottles.


The finishing touch was a little bit of sparkle. I ran Stickles, which I love, around the circles.


Now, let me tell you a little story to explain the display...

On my drive to the park where Ryan plays softball, there is a farm-style house, wrap-around porch and all, with an organic tomato stand out front. Every week, I slow down as I drive by, gawking at how adorable it is. One week, I drove by and they had a ton of antiques and goodies out front in the yard. I dropped Ryan off at his game and came back right away. It turns out they were setting up for a yard sale the next day, but they were such nice people they let me look around. Not only had the family owned an old-fashion soda fountain in town, but they recently threw a wedding in the backyard for their daughter. This led to many amazing finds for me including : retro tin drink signs, large vintage window panes, and much more.

I spotted boxes of these small wooden crates. They had used them for centerpieces at the wedding. I jumped on the little crates (they were only 50 cents each!), itching to find a use for them.

I primed and spray painted a couple of the crates with a robot silver. Then used them to display the favors at the baby shower. I also sprayed a couple of the crates red to prop up the drink dispensers, which you can see here.


The last step was to stuff the bottles with something delicious. We displayed the bottles near the entrance with this sign that I made using a spray-painted thrift store frame.


Pin It

Wednesday, October 12, 2011

Somewhat Sneaky Sloppy Joes


I've never been a huge fan of Sloppy Joes. Mostly because the only ones I'd ever had were as a child, when the men in my family were making them out of a can. They were bland and never looked appetizing. That and they always remind me of that Lunch lady song by Adam Sandler. Suh-lop-pee Joe, slop, Slop-pee Joe. 

That was until I came across this recipe by the Foodie Bride. They taste nothing like typical Sloppy Joes. They have great flavor and they're packed with veggies. Hence the name "Sneaky" Joes. The Foodie Bride blended the veggies in the food processor to sneak them in on her husband. This would also be a great way to sneak veggies in, if you have kids. 

I made a few adjustments like adding chorizo and using sweet hot mustard. I always end up using ground beef, because I always have a ton in the freezer. Next time, I'm going to try it with ground turkey. Either way, I promise you'll love this recipe. It smells incredible and it reheats really well for lunch the next day!

Read on for the recipe...

Somewhat Sneaky Sloppy Joes
  • 1/2 medium onion
  • 1 large carrot, peeled
  • 1 large red bell pepper
  • 1 zucchini, peeled
  • 2 cloves of garlic
  • 1 lb. ground beef or turkey (use 1 1/2 lb if you like lots of meat)
  • 1/2 casing of chorizo
  • 1 Tbsp. olive oil
  • 2 Tbsp. chili powder
  • 1/2 tsp. cumin
  • 15 oz. can crushed tomatoes
  • 1/4 cup water
  • 1/4 cup dark brown sugar (not packed)
  • 2 Tbsp. red wine vinegar
  • A couple dashes of hot sauce (I used Tapatio)
  • 1 Tbsp. Worcestershire sauce
  • 2 Tbsp. Sweet Hot mustard
  • 2 Tbsp. tomato paste
  • Salt and Pepper
  • Buns (for serving)
Start by peeling the veggies and cutting them into large chunks.


Place the carrot into the food processor first (it needs a little extra time in the chopper). Pulse the carrots until they are finely chopped. Then add in the onion, garlic, zucchini and bell pepper. Pulse until the veggies are "obliterated" (in the words of the Foodie Bride), so that will blend into the meat mixture undetected. It will smell amazing, like salsa.


Cook the beef and chorizo in a large skillet. Be sure not to overcook the meat, because it will continue to cook when added to the veggies. Drain the fat from the meat, then set meat aside. 

Heat olive oil in the pan over medium-high heat. Add the vegetable mixture to the pan and cook, stirring often, until most of the liquid cooks off (about 10 minutes). Add the chili powder and cumin to the veggies, stir. Now mix the meat into the veggie mixture.


Add the crushed tomatoes, water, brown sugar, vinegar, mustard, hot sauce and tomato paste to the pan. I even add some crushed red pepper, because we like it HOT. Reduce the heat to medium and cook for another 10 minutes, until heated through. Add salt and pepper to taste. Serve on toasted buns. Delicious!


Is it just me or is it extremely difficult to make a Sloppy Joe look pretty in pictures?


Pin It
Related Posts Plugin for WordPress, Blogger...